High Power Rocketry
March 31, 2022
Back in college one of my extracurriculars was rocketry. You’d buy a kit, put it all together, drive out to the desert, launch it, and finally: recover it. For me, that last part was the toughest. Here’s an image of the area that I launched rockets in:
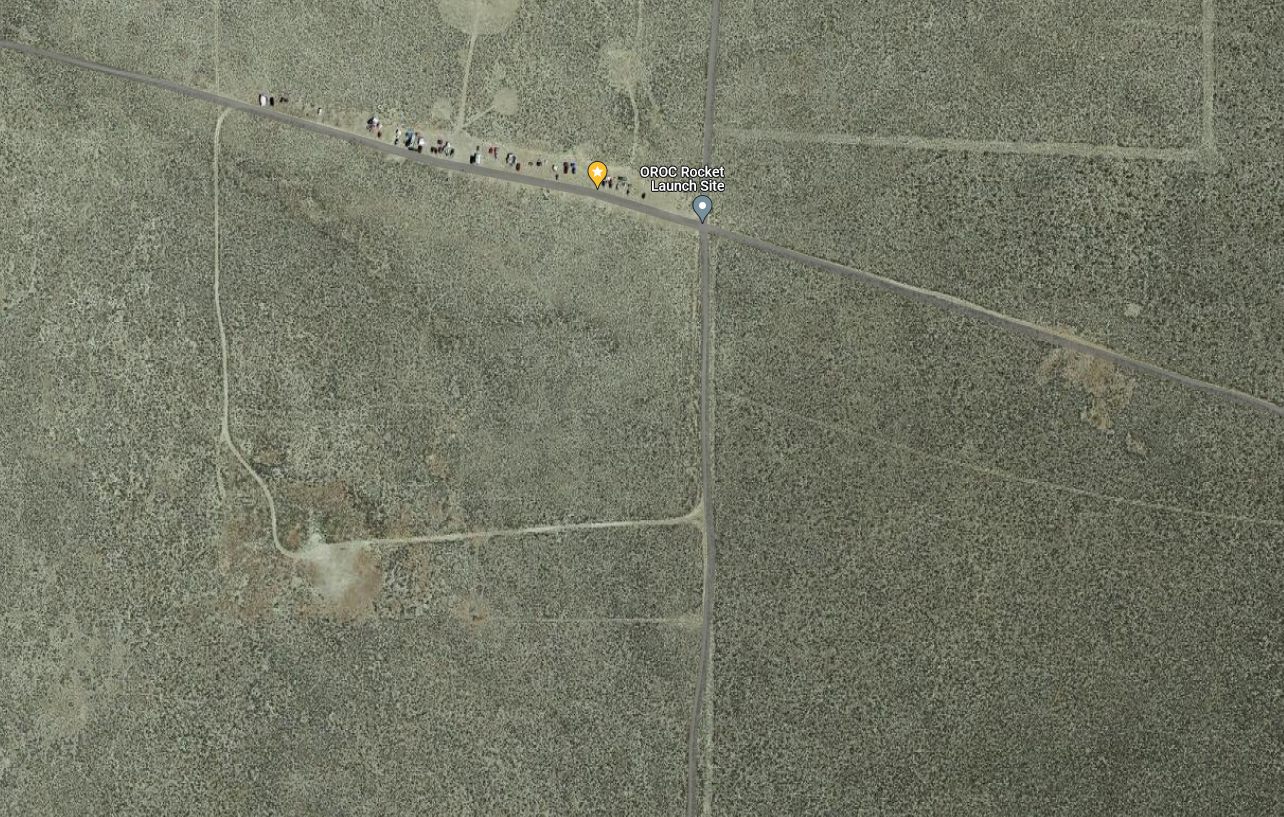
The geography was very homogenous, landmarks spaced far apart, easy to get lost in. My rocket didn’t have any tracking equipment besides the two eyes in my head and that wasn’t enough. I spent several hours out in this desert looking for my rocket and I could not find it. Next time will be different, I will make sure of that.
The Solution
Arduino powered Avionics!
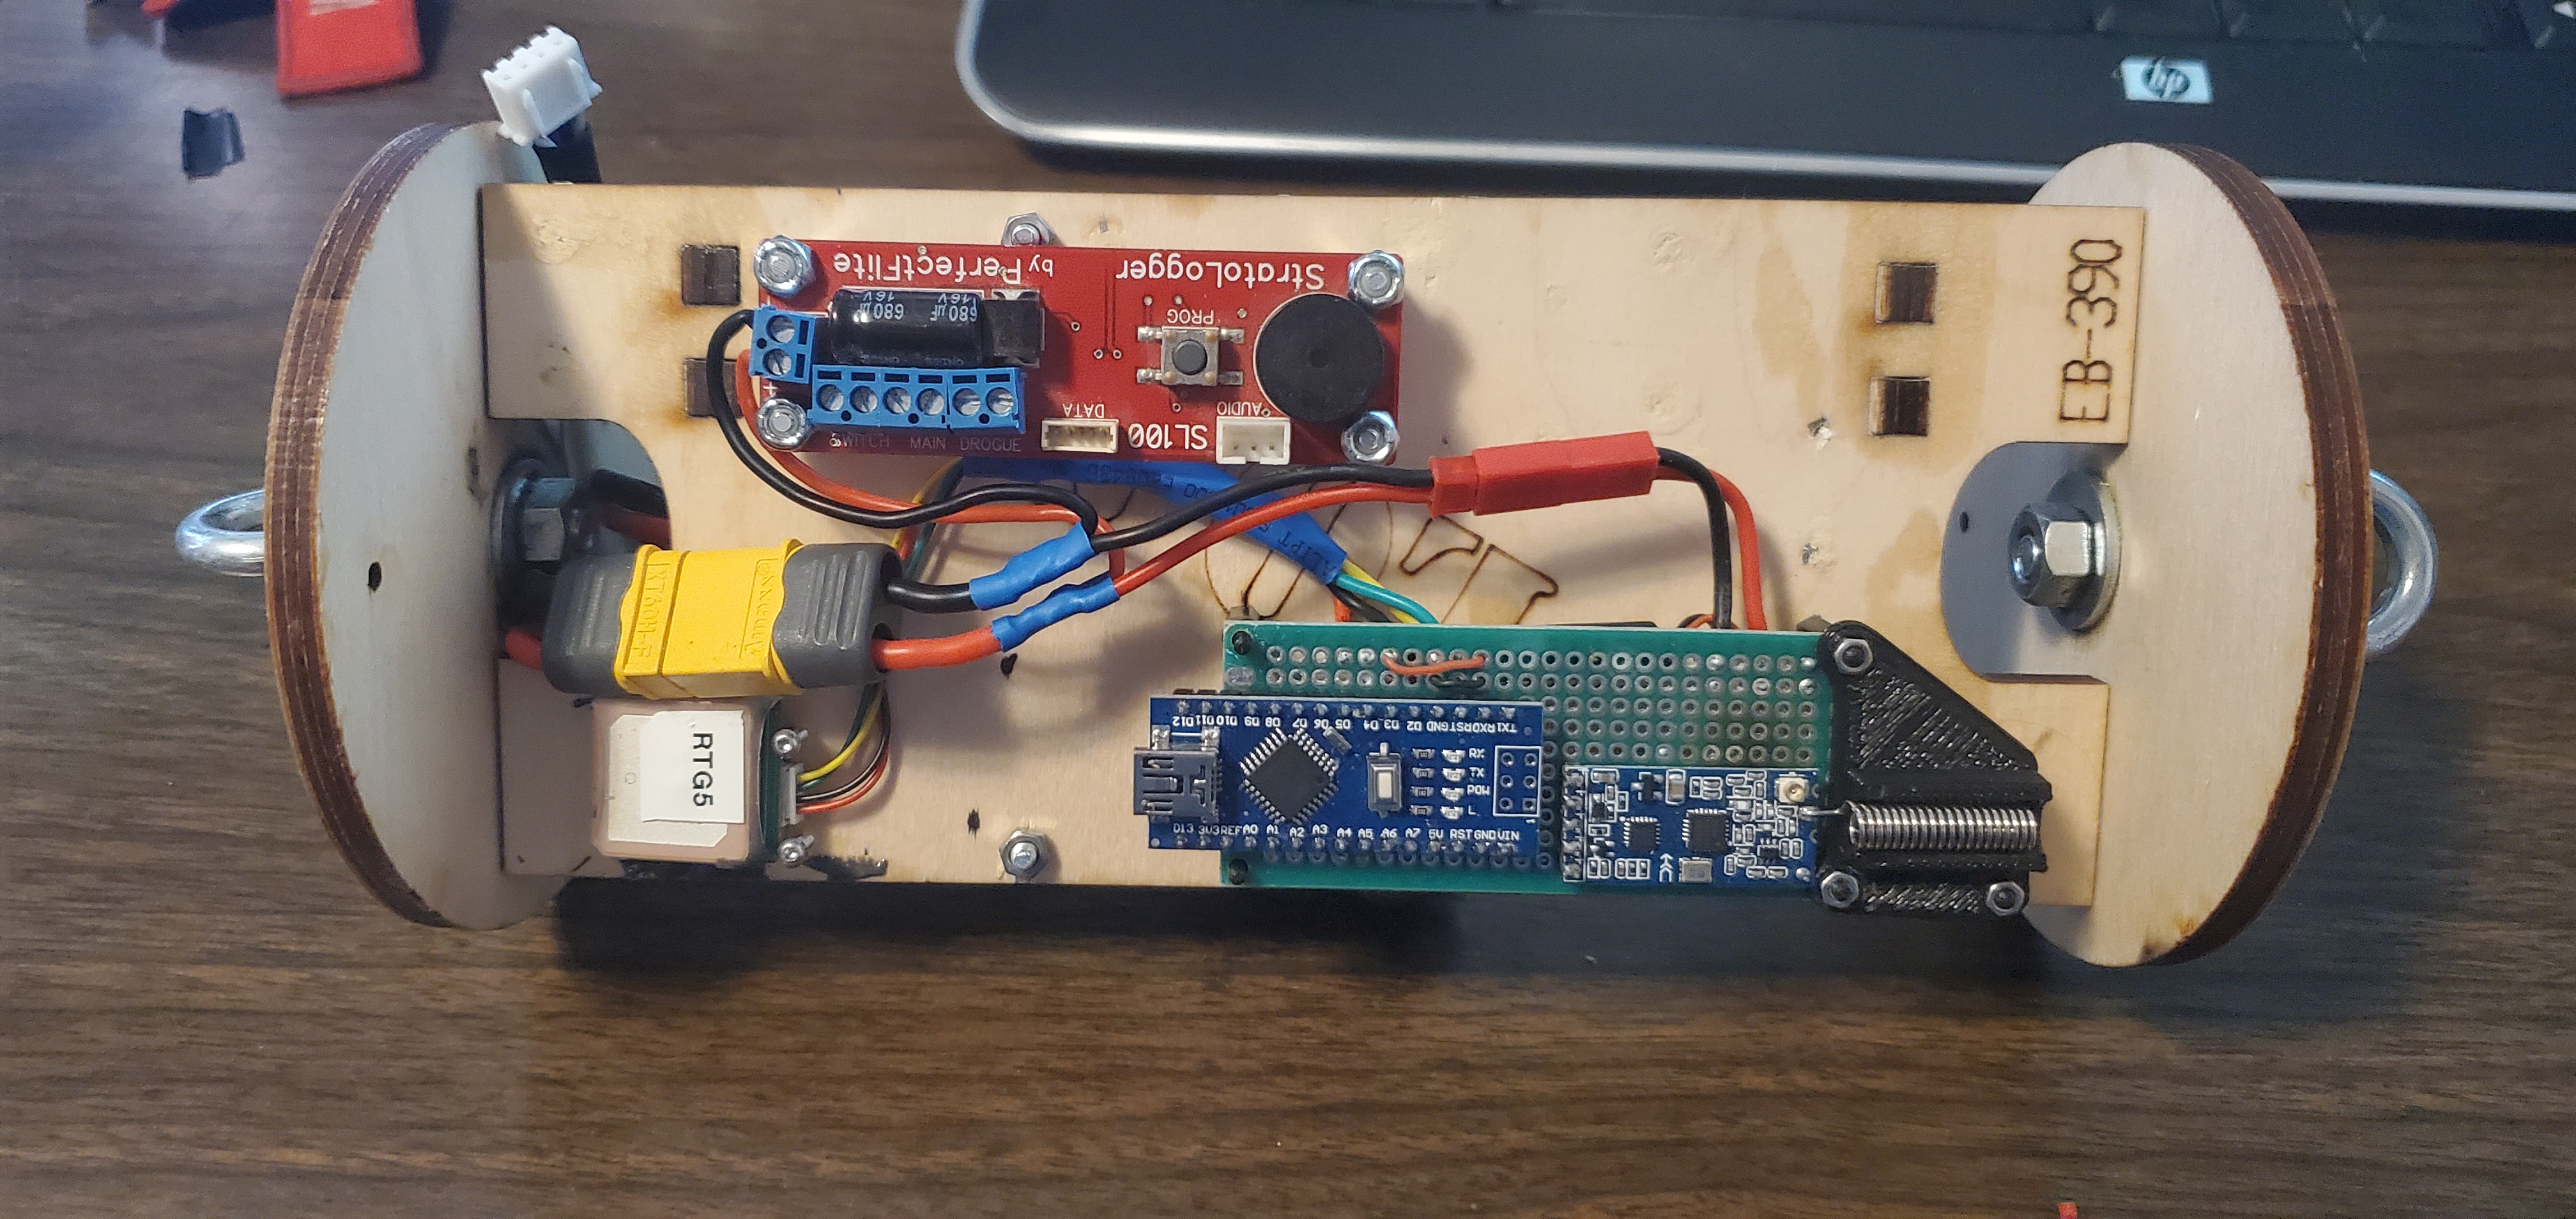
It consists of:
- Stratologger for altitude measurement
- GPS for positional measurement
- Arduino for converting that GPS dat
- an HC12 for transmitting to the ground
- a 2 cell Li-ion battery pack
I don’t really have a plan as to when it will get launched.
Now I need to do the following before I launch it:
Spotweld the 2s Lithium-ion battery togetherCreate a new bracket to hold the battery in the telemetry bayAdd a screw switch for safety purposes (might have to make these myself)Possibly re orient the Telemetry antenna (the spring in the top photo)swap out the plastic M2 spacers for brass (better strength)hot glue the electronics together as a sort of poor man’s pottingFigure out how to use the stratologger to deploy parachutesmake deployment charges for the stratologger to triggerattach ferrules to all wires going into the stratologger’s screw terminalsattach launch lugs / tubesand down the leading and trailing edges of the finspaint the rocket and add decals
Once I arrive at the launch site I’ll need to do the following
Charge the Battery upFold and pack the chute(s)Load the “dog barf” shredded insulationload the powder charges and more dog barfactivate the stratologger, confirm the deployment at peak altitude settingsmake sure telemetry is functioninglaunch
The arduino is running this code:
#include <TinyGPS++.h> //Requires the TinyGPSPlus library
#include <SoftwareSerial.h>
#include <PrintEx.h>
/*
   This sketchis designed for an arduino nano to take in GPS NMEA strings from a hobby grade GPS (BN220, BN880Q, Ublox M8N, etc).
   I designed this sketch to use a HC12 radio (for simplicity, although that didnt turn out), these radios by default
   use 9600 baud, but this script will run far lower baud than that.

   to get minimum baud necessary I used the following math:  (52 bytes/packet)*( ~2 packets per second) * (8 bits/byte)  = ~~840 baud (or bps, your choice).
   This is nice and low. i'd recommend minimum of 1200 baud. Some radios use a higher baud for internal error checking, so go to the next higher available, probalby 2400.
   heres where I got some inspiration:
   https://github.com/iNavFlight/inav/blob/master/docs/Telemetry.md

  Output format:
  A44.568103,O-123.271810,T12:00:01,H464.0,S13,V8.19
*/
const int RX1Pin = 5, TX1Pin = 4, TimetoTX = 950; // Pin assignment, and minimum delay in milliseconds between 2 transmissions
const int ardSX = A4;
const uint16_t GPSBaud = 9600; // gps baud (usually 9600)
const uint16_t TXBaud = 2400; // radio serial baud (usually 57600)
const int16_t local_TZ_hrs = -8; // your local time zone, use negative and positive where applicable
short Local_time_hrs = 0; // holds the hr for GMT - > GMT-X conversion
unsigned long timeTX = 0; // holds last transmission time
const int battsensepin = A5; // pin for sensing battery voltage
TinyGPSPlus gps;// The TinyGPS++ object

SoftwareSerial ss(RX1Pin, TX1Pin); // RX, TX
PrintEx myPrint = ss;
void setup()
{
  pinMode(13,OUTPUT);
  // The serial connection to the GPS device
  Serial.begin(GPSBaud); //GPS spits out a lot of data, and since this mirrors USB comms, we shouldnt send those bytes to the TX
  ss.begin(TXBaud);  // software serial because of low baud (like 1200 or 2400, very easy for the aruino to handle
  //setupTX(1);
  digitalWrite(13,HIGH);
  ss.println(F("Serial GPS sender for Kit Rocketry"));
  delay(50);
  ss.print(F("TinyGPS++ library v. ")); Serial.println(TinyGPSPlus::libraryVersion());
  delay(50);
  ss.println(F("\nSketch By Kyle Magness (541-745-9954, KJ7HCI)"));
  ss.println();
  digitalWrite(13,LOW);
}
void loop()
{
  // This sketch displays information every time a new sentence is correctly encoded.
  while (Serial.available() > 0) // if its connected to the GPS (should be soldered), run the parser, else check next tick
    if (gps.encode(Serial.read()) &  ((millis() - timeTX) > TimetoTX)) { // send coords if available & not sent too recently
      sendInfo(); // that big ass function below
      timeTX = millis(); //set new TX time
    }
}


void sendInfo() //collects data from GPS and formats into compact string for sending over radio
{
  if (gps.time.hour() > -local_TZ_hrs) { // if later than 8am in Greenwich
    Local_time_hrs = gps.time.hour() + local_TZ_hrs;
  }
  else {
    Local_time_hrs = 24 + (gps.time.hour() + local_TZ_hrs); // this allows us to print in nice 24hr time,
  }                                              // with a gmt -X timezone
  if (Local_time_hrs == 24) {
    Local_time_hrs = 0;
  }

  // now we format our string and insert our sensor values, then send it off to the radio for transmission
  digitalWrite(13,HIGH);
  myPrint.printf("A%-11.6f,O%-11.6f,T%02.0d:%02.0d:%02.0d,H%07.1f,P%02.0d,V%04.2f\n",
                 gps.location.lat(),
                 gps.location.lng(),
                 Local_time_hrs,
                 gps.time.minute(),
                 gps.time.second(),
                 gps.altitude.meters(),
                 gps.hdop.value(),
                 sense_battery());

  //.println(output);
  digitalWrite(13,LOW);
}

float sense_battery() { // Reads battery voltage and returns the value as a string for printing
  // make sure to use a 1 - 1 voltage divider, so that voltage is divided by 2! for a 2S lithium battery, this works best.
  int senseval = map(analogRead(battsensepin) * (1.8223), 0, 1023, 0, 5000); // convert sensor pin value to millivolts, multiplied by 2 for voltage divider
  //String outstring =  String(float(senseval)/1000,3); // I now everone hates floats and strings but this was fastest and I have many cycles to spare
  //String outstring = String(sensestring[0] + "." + sensestring[1] + sensestring[2] + sensestring[3]+ '\0'); // I wanted to do it this way but it kept failing for some reason
  return senseval;
}

void setupTX(bool mode) {
  if (mode)
  {
    pinMode(ardSX, OUTPUT);
    digitalWrite(ardSX, LOW);
    delay(200);
    Serial.println("AT+B2400"); //set baud to 2400 bits/sec
    Serial.println("AT+FU3"); //set normal mode
    ss.println("AT + P1"); // set power mode (1 = 1dbm, 8=20dbm)
    delay(100);
    ss.println("AT + C001");
    delay(100);
    pinMode(ardSX, INPUT);
  }
  else
  {
    pinMode(ardSX, INPUT);
  }
}